I'm posting while on my way home from work. Don't panic, I'm riding the Indy Commuter Express bus, which offeres wireless connections while in route. It's the first time I've done it this year, and it's pretty cool.
My plans to participate in the Louisville LVL1 sumobot competition were swept aside by the flooding of my basement just prior to the Ft. Wayne Maker Faire. My sumobot is still a bare pc board and a cardboard model. I am working to complete it, having ordered parts for IR sensors and styrene for the structure. I'll be putting together a small vacuum molder and trying my hand at that soon. I will post pictures on flickr.
I also just ordered a bunch of nema 17 stepper motors. I plan on rebuilding my drawbot into something cooler and able.
Well, almost home now, so I'll sign off. More later.
Tuesday, November 1, 2011
Monday, October 3, 2011
Ft. Wayne Regional Maker Faire
Things conspired against me for my trip to the Maker Faire in Ft. Wayne. The weekend before my basement flooded and I had to completely tear down my entire electronics studio. This left me without a lot of opportunity to finish the integration of the pen up/down mechanism in my drawBot prior to taking it. I got it working and managed to successfully draw one .svg file before having to tear it back down for transport. Needless to say when I got there on Saturday morning I spent several hours of show time trying to get it to work again and never succeeded. So I fell back to drawing Hilbert curves again, like at Detroit. I tried and failed to get it running again Sunday. Then my laptop became grumpy and decided it had had enough. So, I packed it in early and left about 11:00.
Even with all the problems I still really had a good time. I managed to con my 11 and 13 year old kids into coming with me. That meant I had company, and they got to see their first maker faire. They hung with me all day Saturday, and didn't complain once about being bored. The folks from TechVenture did a great job putting on the Faire. I will come back next year, and recommend the event to all Makers.
See the few pictures I took here.
Monday, August 22, 2011
DrawBot Update
I haven't had a lot of time or energy for making since returning from the faire. I have managed a couple of advances on the DrawBot.
First off, I've made the switch from turtle type graphics, implemented in the Hilbert program, to drawing lines between coordinates. This may not sound like much, but it's one of the things I needed to accomplish to get the DrawBot to draw InkScape .svg files.
The second advance is I've gotten an .svg path decoder working, so I can create a drawing in Inkscape utilizing paths, save it as .svg, open it in my decoder, and get out a stream of coordinates, that when I draw straight lines between them, will reproduce the Inkscape drawing.
The one remaining item I need to fully implement .svg drawing is working pen up/down hardware. I built and tested a board this past weekend. Now it's a matter of integrating the new hardware and software.
For now though, here's a video of a spirograph type graphic using the new coordinate based graphics - Enjoy.
Tuesday, August 2, 2011
Successful Trip to Maker Faire Detroit
Well, I'm back from my premeir at the Detroit Maker Faire! It's the first time I've ever exhibited at a Maker Faire and it was great, and terrible. Here are some things I learned for next time, in no particular order.
- I went to the faire, and manned my booth by myself. This it turns out is far harder than I ever imagined it would be. Saturday I was "on stage" just short of ten hours. Sunday I packed up early to avoid the rush, and because I was exhasted, but it was still a seven hour day. It takes a lot of energy to project enthusiasium for that long. I was totally unprepared for that aspect.
- Given the chance, knowing what I know now, I'd do it again in a second. Exhibiting at the faire was really rewarding in two distinct ways. One, when I could have a long conversation with another adult who "gets" what I'm doing and understands what I'm saying when I explain it. I don't get the opportunity for conversations like this often, and the faire was great in this way. Two, seeing kids' faces light up when they'd interact with one of my machines and be surprised by what it did. I would very often have to coax them into touching something, while at the same time reassuring their parents it was okay, and I'd get rewarded with a big smile and an involuntary breathless little "cooool".
- Damn the rules, eat, drink, and go to the bathroom at every opportunity.
- Be nice to the folks in the booths around you and they'll be nice back (Paul and Mary were great!) Go mad dog robotics!
- Don't expect to see the rest of the faire. I only got the chance to see about five percent of what I did last year when I wasn’t a maker. I was planning to walk around a bit after packing up Sunday afternoon, but I was way too tired.
- The crowd has great ideas, listen and learn. I brought about six projects to show. One was my drawbot, and one was my electronic organ. Several times people played the organ expecting it to somehow control what was happening on the drawbot. GAH – what a cool idea!
- Sometimes lame is cool and cool is lame. I worked really hard before the faire on an enclosure for my electronic organ. It’s made from walnut, brass, and ash, is very precisely made and has a really swanky finish. I just didn’t get it working quite in time, so instead I brought the lego keyboard I had working. Turns out the organ was the biggest hit with the kids – mostly because it was made from legos.
Sunday, June 12, 2011
Update on the Drawbot
While writing finer control software for the Drawbot I discovered an previously undetected issue with the driver board. It took me a couple of days to isolate and fix the issue, but once I nailed that down the bot really started behaving well. This video shows it with its intended control scheme implemented. There's a Python application running on my pc which communicates drawing commands over the Arduino's USB-serial interface. The Python app calculates an 8 deep Hilbert curve, and translates it into the appropriate drawing commands. The legs of the curve are about 1/4 of an inch long, and have 32 steps each, making the overall resolution of the bot about 128 dpi. Not too shabby for about $65.00 in parts - including the cost of the Arduino.
Tuesday, June 7, 2011
Drawbot makes its mark
This evening I got my drawbot up and running for the first time. The mechanics are still pretty shakey, but the electronics have been burned in for several hours now and I'm pretty confident they're solid. The 'bot is based on an Arduino with a dual axis opto-isolated unipolar stepper motor driver shield that I designed and built myself. As soon as I can figure out a place to put them, I'll post the Eagle files for the shield.
I'm writing a PC application in Python to do some image manipulation and drive the 'bot. When I get it further along I'll post again.
I'm writing a PC application in Python to do some image manipulation and drive the 'bot. When I get it further along I'll post again.
Monday, April 25, 2011
Archimedes would be proud

For a school project, my 11 year old is taking on, for the night, the persona of Archimedes. Part of the project was coming up with three artifacts related to his character, so last weekend we built this catapult.
It's modeled after a picture we found on the internet. Built from 1/2 inch square pine, with a white oak bow and bamboo axels.
Of course, it being Easter last Sunday we tested the beast on the most available item, and discovered it will shoot a jelly bean 30 feet.
Sunday, February 6, 2011
Surprises from the Arduino
As an expansion to the organ project I've been working on I bought a rotary encoder. Of course I got it surplus, and it came without any data. So yesterday I hooked it up to my Arduino to see if I could make some sense of what it did. After about 10 minutes of bread boarding, and 10 writing a sketch (well modifying one of the examples) I had a thing. On reset it would play a constant tone - if I twised the encoder one direction the tone would get lower, the other way it would get higher - cool.
The surprise came because I didn't put any limit checking into the code prior to the call to tone() - hence, when twisting the encoder brought the pitch down to zero - or into the negative numbers - I got some really interesting results. Give a listen.

The surprise came because I didn't put any limit checking into the code prior to the call to tone() - hence, when twisting the encoder brought the pitch down to zero - or into the negative numbers - I got some really interesting results. Give a listen.
Monday, January 31, 2011
Razor E100 Scooter Repair
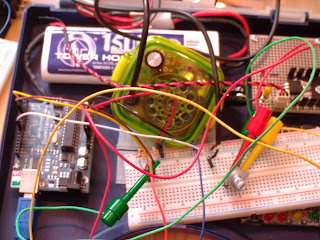
I bought a Razor E100 electric scooter at a garage sale for $10.00 a while back. Right off I discovered it needed new batteries (no surprize there), so for another $32.00 and an hour's work it had new batteries. Unfortunately it still didn't work. This past weekend I spent some time tracking down the problem with the little control board. Turns out there was a little surface mount transistor that had gone bad. I don't have any surface mount transistors, so I cobbled up installing this through-hole 2N2222. Everything works great now! We'll see how long the spit and baling twine fix lasts once the weather turns nice and my boys start abusing it. Sorry for the blurry picture - I didn't feel like walking up the stairs for my real camera and I used my flip cam.


Monday, January 17, 2011
ONE DAY BUILD - Auto Waterer
Last Saturday I put this together for my wife. She has a bunch of potted plants living out the winter in our basement. Unfortunately watering them gets to be a real pain, as we have to go upstairs for water, and dole it out to each plant individually.
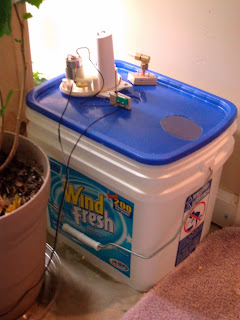
I upcycled the guts of a battery powered shower cleaning sprayer, keeping just the pump. I added about $12.00 of plumming parts from the big box, and a #5 (non-recycleable) bucket. When I explained to the plumming guy at the big box what I was doing he even went out of the way to give a piece from the scrap bin - saving me about $6.00.

It's pretty simple right now, the float switch is wired inline with the motor and a wall wart. When you pour water into the bucket the float switch closes and the pump comes on. There's about 25 feet of 1/4 inch tubing coming off the output of the pump. Over every plant I drilled a small hole in the tubing. With the pump on, all the plants get a health squirt of water. When the pump empties the bucket the float switch turns it off. It will pump 3 gallons of water in about 5 minutes. So now, every couple days I carry a couple gallons of water down the stairs, dump them in the bucket, and forget about it. [Image] One of these day's I build a moisture sensor and an alarm so it will tell me when it's time to water - or even do it with an Arduino and an ethernet shield so it will send me a tweet - or have it's own web page with a web cam - or - or - or -
Tuesday, January 11, 2011
Long Time no Post
I can't believe it's been so long since I posted here. Over the past months I've spent a lot of time putzing in my wood shop. I've got a project that's almost ready to put up here. Also after many months of work my wife and I finally got the basement put back together, so I have a real office/electronics workspace now. Using this new space I've recently put the finishing touches on a new version of the B.bro robot. This version has the same mechanics, but a cheaper power supply and motor driver, and is implemented with all custom circuit boards instead of protoboard. 

Around the perimeter of the top board are six three pin connectors. They accept sensor modules. The photo shows two digital light sensors and an infra-red proximity sensor. I also have built analog light sensors, and I'm working on a sound sensor now. I just put the finishing touches on the hardware a couple days ago. Now it's time to write some cool software for him.
Subscribe to:
Posts (Atom)